Rss Feed Like Us on facebook Google Plus
Showing posts with label asp.net. Show all posts

July 9, 2013

Real World Example of Abstract Class and Interface

An abstract class is a class that you cannot create an instance of. It can provide basic functionality, but in order for that functionality to be used, one or more other classes must derive from the abstract class. One of the major benefits of abstract classes is that you can reuse code without having to retype it. 

That has a plethora of benefits, such as reducing bugs and making coding faster. A concrete example of an abstract class would be a class called Animal. You see many animals in real life, but there are only kinds of animals. That is, you never look at something purple and furry and say "that is an animal and there is no more specific way of defining it". Instead, you see a dog or a cat or a pig... all animals. The point is, that you can never see an animal walking around that isn't more specifically something else (duck, pig, etc.). 

The Animal is the abstract class and Duck/Pig/Cat are all classes that derive from that base class. Animals might provide a function called "Age" that adds 1 year of life to the animals. It might also provide an abstract method called "IsDead" that, when called, will tell you if the animal has died. Since IsDead is abstract, each animal must implement it. So, a Cat might decide it is dead after it reaches 14 years of age, but a Duck might decide it dies after 5 years of age. The abstract class Animal provides the Age function to all classes that derive from it, but each of those classes has to implement IsDead on their own.

Now, an interface is like an abstract class, except it does not contain any logic. Rather, it specifies an interface. So, there might be an interface called IFly. This might have the methods GoForward and GoDown. Those methods would not actually contain any logic... each class that implements interface IFly would have to implement those GoForward and GoDown methods. You could have classes Duck and Finch implement interface IFly. Then, if you want to keep a list of instances that can fly, you just create a list that contains items of type IFly. That way, you can add Ducks and Finches and any other instance of a class the implements IFly to the list.

So, abstract classes can be used to consolidate and share functionality, while interfaces can be used to specify what the common functionality that will be shared between different instances will be, without actually building that functionality for them. Both can help you make your code smaller, just in different ways. There are other differences between interfaces and abstract classes, but those depend on the programming language, so I won't go into those other differences here.

Do you mean real-world as in "A live software system which includes  Abstract classes or interfaces" or do you mean "


If you mean the latter think of Vehicle as an abstract class. You can't yet do anything with it because you have no idea what it does, or how to drive it.

abstract class Vehicle{}

Vehicles could be split into morotized and pedal-powered, but still this is abstract, we still dont know what to do with it.

abstract class MotorVehicle : Vehicle {} 
abstract class PedaledVehicle : Vehicle {}

You could now define a concrete (non-abstract) class, like car.

class MotorCar : MotorVehicle {}

 Intefaces come in handy you can only inherit from one base class. So imagine some vehicles are drivable, others are remote controlled, some vehicles use a stearing wheel, others dont

interface IDrivable{}
interface IHasStearingWheel{}

Now you could derive a DrivableMotorCar from its base clas, and also implement other behaviours.
class DrivableMotorCar : MotorVehicle, IDrivable, IHasStearingWheel {}


Recommendations for Abstract Classes vs. Interfaces

The choice of whether to design your functionality as an interface or an abstract class (a MustInherit class in Visual Basic) can sometimes be a difficult one. An abstract class is a class that cannot be instantiated, but must be inherited from. An abstract class may be fully implemented, but is more usually partially implemented or not implemented at all, thereby encapsulating common functionality for inherited classes. For details, see Abstract Classes.
An interface, by contrast, is a totally abstract set of members that can be thought of as defining a contract for conduct. The implementation of an interface is left completely to the developer.
Here are some recommendations to help you to decide whether to use an interface or an abstract class to provide polymorphism for your components.
  • If you anticipate creating multiple versions of your component, create an abstract class. Abstract classes provide a simple and easy way to version your components. By updating the base class, all inheriting classes are automatically updated with the change. Interfaces, on the other hand, cannot be changed once created. If a new version of an interface is required, you must create a whole new interface.
  • If the functionality you are creating will be useful across a wide range of disparate objects, use an interface. Abstract classes should be used primarily for objects that are closely related, whereas interfaces are best suited for providing common functionality to unrelated classes.
  • If you are designing small, concise bits of functionality, use interfaces. If you are designing large functional units, use an abstract class.
  • If you want to provide common, implemented functionality among all implementations of your component, use an abstract class. Abstract classes allow you to partially implement your class, whereas interfaces contain no implementation for any members.

Reference:-


Read More

Model View Controller (MVC) in Asp.net

The Model-View-Controller (MVC) pattern was introduced in 1970s. It is a software
design pattern that splits an application into three main aspects : Model, View and Controller. Moreover, MVC pattern forces a separation of concerns within an application for example, separating data access logic and business logic from the UI.

Model
The Model represents a set of classes that describes the business logic and data. It also defines business rules for how the data can be changed and manipulated.
Moreover, models in Asp.Net MVC, handles the Data Access Layer by using ORM tools like Entity Framework or NHibernate etc. By default, models are stored in the Models folder of the project.

View
The View is responsible for transforming a model or models into UI. The Model is responsible for providing all the required business logic and validation to the view. The view is only responsible for displaying the data, that is received from the controller as the result.
Moreover, views in Asp.Net MVC, handles the UI presentation of data as the result of a request received by a controller. By default, views are stored in the Views folder of the project.

Controller
The Controller is responsible for controlling the application logic and acts as the coordinator between the View and the Model. The Controller receive input from users via the View, then process the user's data with the help of Model and passing the results back to the View.
Moreover, controllers in Asp.Net MVC, respond to HTTP requests and determine the action to take based upon the content of the incoming request. By default, controllers are stored in the Controllers folder of the project.

Read More

July 4, 2013

How to prevent page going back on backspace button click

Stop page going back on backspace button click in asp.net,C#,java,PHP.


1. To prevent page going back on backspace or browser back button. you can achieve this by short snippet by javascript below.

<script type="text/javascript">
function preventBack() 
{ 
    window.history.forward(); 
}
setTimeout(function () { preventBack() }, 0);
window.onunload = function () { null };
</script>
.

Follow my blog with Bloglovin
Read More

Disable Button after once Click by Javascript

Disable Button after clicking on it.If when you set disabled="disabled" immediately after
the user clicks the button, and the form doesn't submit because before form submission button is already diasabled..

Uses- It prevents double form submission/ prevent double postback


 you could try these things

1st Way...

//JAVASCRIPT
<script type="text/javascript">
function disable() {
            var v = confirm('Are you sure to save');
            if (v == true) {
                setTimeout(function () { document.getElementById('<%= btnSave.ClientID %>').disabled = true }, 1);
                return true;
            }
            return false;
        }
 
        function preventBack() { window.history.forward(); }
        setTimeout(function () { preventBack() }, 0);
        window.onunload = function () { null };
</script>
//HTML
<input type="button" id="btnsave" runat="server" value="Save" onclick="javascript:disable()" />
2nd Way

myInputButton.disabled = "disabled";
myForm.submit()
Whether it be due to a users lack of tech know-how or a twitch of the finger, a secondary click of a forms ‘Submit’ button could result in the form being submitted twice. Depending on the action of the form this could in turn send two enquiries, create two orders or insert a record into the database twice.

3rd Way

<input type="submit" name="Submit" value="Submit" onclick="this.disabled=true; this.value='Please Wait...';" /> 

4th Way
We can also use AJAX to disable postback element on Request Begin to prevent multiple clicks.

<form id="form1" runat="server">
<asp:scriptmanager id="sc" runat="server" enablepartialrendering="true">  
</asp:scriptmanager>
<script type="text/javascript">
    Sys.WebForms.PageRequestManager.getInstance().add_beginRequest(beginReq);
    function beginReq(sender, args) {
        document.getElementById('<%= lblMessage.ClientID %>').innerText = "Processing.....";
        args.get_postBackElement().disabled = true;
    }  
</script>
<asp:updatepanel id="updpnlSubmit" runat="server">  
    <ContentTemplate>  
        <asp:Button ID="btnSubmit" Text="Submit" runat="server" OnClick="btnSubmit_Click" />  
        <asp:Label ID="lblMessage" runat="server"></asp:Label>  
    </ContentTemplate>  
</asp:updatepanel>
</form>

Read More

June 15, 2013

Setup Custom Error Page for 404 Page Not Found :ASP.NET

To set up custom error page in Asp.net.simply you have to just add a custom error code in
web.config file for aspx pages.and for Non aspx pages like html,php,jsp or only strings after url, you have to add httperrors code to web.config file.

 >> Add below codes in <configuration> Tag in web.config

For Aspx Pages

<system.web>
    <customErrors defaultRedirect="404.aspx" mode="On">
      <error  redirect="404.aspx" statusCode="404" />
    </customErrors>
  </system.web>


For Non-Aspx pages

  <system.webServer>
    <httpErrors errorMode="Custom">
      <remove statusCode="404" subStatusCode="-1" />
      <error responseMode="Redirect" statusCode="404" prefixLanguageFilePath="" 
             path="404.aspx" />
    </httpErrors>
  </system.webServer>


you can design your 404 page using these links
http://www.smashingmagazine.com/2009/01/29/404-error-pages-one-more-time/
Read More

March 13, 2013

Cookies in Asp.Net

Introduction

Cookies are also known by many names, HTTP Cookie, Web Cookie, Browser Cookie, Session Cookie, etc. Cookies are one of several ways to store data about web site visitors during the time when web server and browser are not connected. Common use of cookies is to remember users between visits. Practically, cookie is a small text file sent by web server and saved by web browser on client machine.

Use of Cookies?

Cookies may be used for authentication, identification of a user session, user's preferences, shopping cart contents, or anything else that can be accomplished through storing text data. Cookies can also be used for traveling of data from one page to another.

Is Cookies Secured?

Well, this question has no specific answers in YES or NO. Cookies could be stolen by hackers to gain access to a victim's web account. Even cookies are not software and they cannot be programmed like normal executable applications. Cookies cannot carry viruses and cannot install malware on the host computer. However, they can be used by spyware to track user's browsing activities.

Using Cookies

Creating/Writing Cookies

There are many ways to create cookies, I am going to outline some of them below:

Way 1 (by using HttpCookies class)

//First Way
HttpCookie StudentCookies = new HttpCookie("StudentCookies");
StudentCookies.Value = TextBox1.Text;
StudentCookies.Expires = DateTime.Now.AddHours(1);
Response.Cookies.Add(StudentCookies);

Way 2 (by using Response directly)

//Second Way
Response.Cookies["StudentCookies"].Value = TextBox1.Text;
Response.Cookies["StudentCookies"].Expires = DateTime.Now.AddDays(1);

Way 3 (multiple values in same cookie)

//Writing Multiple values in single cookie
Response.Cookies["StudentCookies"]["RollNumber"] = TextBox1.Text;
Response.Cookies["StudentCookies"]["FirstName"] = "Abhimanyu";
Response.Cookies["StudentCookies"]["MiddleName"] = "Kumar";
Response.Cookies["StudentCookies"]["LastName"] = "Vatsa";
Response.Cookies["StudentCookies"]["TotalMarks"] = "499";
Response.Cookies["StudentCookies"].Expires = DateTime.Now.AddDays(1); 

Reading/Getting Cookies

In the above code, I have used many ways to write or create cookies so I need to write here using all the above ways separately.

For Way 1

string roll = Request.Cookies["StudentCookies"].Value; //For First Way

For Way 2

string roll = Request.Cookies["StudentCookies"].Value;  //For Second Way

For Way 3

//For Multiple values in single cookie
string roll;
roll = Request.Cookies["StudentCookies"]["RollNumber"];
roll = roll + " " + Request.Cookies["StudentCookies"]["FirstName"];
roll = roll + " " + Request.Cookies["StudentCookies"]["MiddleName"];
roll = roll + " " + Request.Cookies["StudentCookies"]["LastName"];
roll = roll + " " + Request.Cookies["StudentCookies"]["TotalMarks"];
Label1.Text = roll; 

Deleting Cookies

In the above code, I have used many ways to create or read cookies. Now look at the code given below which will delete cookies.
if (Request.Cookies["StudentCookies"] != null)
{
    Response.Cookies["StudentCookies"].Expires = DateTime.Now.AddDays(-1);
    Response.Redirect("Result.aspx");  //to refresh the page
}

Understanding HttpCookie Class It contains a collection of all cookie values.

We do not need to use any extra namespaces for HttpCookies class (we already have used this in Way 1 above), because this class is derived from System.Web namespaces. HttpCookies class lets us work with cookies without using Response and Request objects (we have already used this in Way 2 and Way 3 above).
image002.jpg  
HttpCookie class has a list of some properties, let us outline them.
  • Domain: It contains the domain of the cookie.
  • Expires: It contains the expiration time of the cookie.
  • HasKeys: It contains True if the cookie has subkeys.
  • Name: It contains the name of the cookie.
  • Path: It contains the virtual path to submit with the cookie.
  • Secure: It contains True if the cookie is to be passed in a secure connection only.
  • Value: It contains the value of the cookie.
  • Values:
Limitations of Cookies
There are following limitations for cookies:
  1. Size of cookies is limited to 4096 bytes.
  2. Total 20 cookies can be used on a single website; if you exceed this browser will delete older cookies.
  3. End user can stop accepting cookies by browsers, so it is recommended to check the users’ state and prompt the user to enable cookies.
Sometimes, the end user disables the cookies on browser and sometimes browser has no such feature to accept cookies. In such cases, you need to check the users’ browser at the home page of website and display the appropriate message or redirect on appropriate page having such message to enable it first. The following code will check whether the users’ browser supports cookies or not. It will also detect if it is disabled too.
protected void Page_Load(object sender, EventArgs e)
{
    if (Request.Browser.Cookies)
    {
        //supports the cookies
    }
    else
    {
        //not supports the cookies
        //redirect user on specific page
        //for this or show messages
    }
}
It is always recommended not to store sensitive information in cookies.
Read More

February 23, 2013

Introduction to Asp.Net Web-API

ASP.NET Web API is a framework that makes it easy to build HTTP services that reach a broad range of clients, including browsers and mobile devices. With WebAPI content negotiation, one can return data based on the client requests. What I mean is, if the client is requesting the data to be returned as JSON or XML, the WebAPI framework deals with the request type and returns the data appropriately based on the media type. By default WebAPI provides JSON and XML based responses.

WebAPI is an ideal platform for building pure HTTP based services where the request and response happens with HTTP protocol. The client can make a GET, PUT, POST, and DELETE request and get the WebAPI response appropriately.

In Summary, the WebAPI is 
- An HTTP Service 
- Designed for broad reach
- Uses HTTP as an Application protocol, not a transport protocol

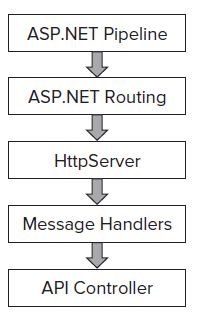
Web API Architecture
We shall see below the Web API architecture when you are hosting the WebAPI in ASP.NET and self-hosting through console or windows service.


Routing configuration in WebAPI is slightly different than the ASP.NET MVC Routing. The WebAPI uses HttpRouteCollection and Route. The WebAPI team have reused the routing logic of MVC in WebAPI. The only reason why it’s a different routing is in order to keep the WebAPI from having its dependency on ASP.NET Routing the team decided to make it independent so that the WebAPI will not have ASP.NET class dependencies and can be hosted in console or  windows service as self-hosting.

While in ASP.NET WebAPI routing, the system will not only register HttpRoute object but also it will create a wrapper Route object and in ASP.NET routing engine.

The significant difference that you can see here is you will not have access to Routing data in message handlers when you are trying to access the same in self-hosting , the reason is the route configuration is set and it will run at the later point in the life cycle.

The other significant difference between the ApiController and the normal MVC controller is with WebAPI ApiController, the actions are dispatched by default based on the HTTP request. However there is a flexibility to override the same so that the WebAPI will use the action name to select the action method within the ApiController.

What is Content Negotiation in Web API ?
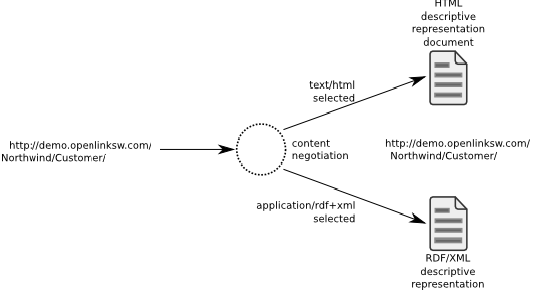
This is something which you will here frequently in Web Api. Content negotiation is the process of selecting the best representation for a given response when there are multiple representations available. The underling Web API framework implements the content negotiation and that is the reason why and how the client can request the data with a specific media type.

By default the Web API returns data in JSON format, however while requesting for a resource we can specify the media type to return so that the Web API knows what you are requesting for and selects proper formatter to output the data. 
How to Implement Web API? 
We shall see a generic implementation of Web API.

One has to create a class which derives from ApiController. The methods defined in the WebAPI controller maps to the HTTP methods. If you have a method name prefixed with GET, it means you are trying to return some data based upon the GET Request. You just have to make sure that whatever actions you are implementing must be prefixed with the right request type (GET, POST, PUT, and DELETE).

Note: The method named need not be Get () or Post () etc. However it does not limits to prefixing the request types , You can still implement the actions with different naming but one has to make sure to use the suitable action filters [HttpGet] , [Post] , [Put], [Delete].

Routing in ASP.NET Web API?
To determine which action to invoke, the framework uses a routing table. Below is the default route which is configured as a part of Global.asax
The routing is quite similar to what we define for MVC controllers
routes.MapHttpRoute(
    name: "Default",
    routeTemplate: "api/{controller}/{id}",
    defaults: new { id = RouteParameter.Optional }
);

The Web API framework receives an HTTP request, it tries to match the URI against one of the route templates in the routing table. If no route matches, the client receives a 404 error.
Action Parameters in Web API simple types are taken from URI - Route data, query parameters. 

Complex types come from the body - Configured MediaTypeFormatters are used to desterilize the request body based on the content type - JSON, XML and form-url-encoded are supported out of the box , also we can override using [FormUrl], [FormBody], [ModelBinder], custom parameter binding.

How to host a Web API ?
One can either go with self or web hosting.

• Self-hosting in any Windows process (e.g., console application or Windows service)
• Web hosting - using the ASP.NET pipeline on top of Internet Information Services (IIS) One has to make a reference and use the below ones if you are going with self-hosting.

Here is the code snippet for self-hosting Web API.
using System.Web.Http;
using System.Web.Http.SelfHost;      
 
var config = new HttpSelfHostConfiguration("http://localhost:8080");
 
config.Routes.MapHttpRoute(
    "API Default", "api/{controller}/{id}", 
    new { id = RouteParameter.Optional });
 
using (HttpSelfHostServer server = new HttpSelfHostServer(config))
{
    server.OpenAsync().Wait();
    Console.WriteLine("Press Enter to quit.");
    Console.ReadLine();
}
In the above hosting, the application listens to the specified URL localhost 8080. One needs administrator privileges for that. If you are facing any issues like “HTTP could not register URL” then you will have to run the below statement in command prompt as Administrator
netsh http add urlacl url=http://+:8080/ user=machine\username
How to manually run the content negotiation and why it’s required?
We have seen above the content negotiation is something which is built inside the WebAPI which will make use of formatters to decode and encode the HttpRequest and HttpResponses.

So the question comes when exactly we need to manually run the content negotiation logic. Here’s one that we can think of, say you are consuming a third party service which always returns the data in JSON format. Your client is accepting or willing to process xml based responses or maybe you have other clients consuming data in different formats like Json or xml. In such scenarios you can think of building a WebAPI as a wrapper around the services that you are consuming. Isn’t it meaningful to build something and return data based on the media type?

Below is the generic code which runs the content negotiation
// Get the IContentNegotiator
IContentNegotiator negotiator = Configuration.Services.GetContentNegotiator();
 
// Run content negotiation to select a formatter
MediaTypeHeaderValue mediaType;
MediaTypeFormatter formatter = negotiator.Negotiate(
typeof(Contact), Request, Configuration.Formatters, out mediaType);
 
// Create a response message with an object content using the selected formatter
HttpResponseMessage response = new HttpResponseMessage() 
{ 
     Content = new ObjectContent<contact>(contact, formatter), 
     RequestMessage = Request 
}; 
Get the content negotiator instance and run the Negotiate method with the following parameters, the type of object you want to return, request object, the default formatters and out param for the media type. At last create a HttpResponseMessage and format the content as per the media formatter which is obtained while doing content negotiation.  

Background

This article is just a start off, a beginner article for WebApi. Basic understanding of MVC is sufficient to understand and implement ASP.NET WebAPI.

Using the code

We shall create a very basic sample WebAPI project and host the same in console and make a request from browser. I am referring the example mentioned in http://www.asp.net/web-api/overview/hosting-aspnet-web-api/self-host-a-web-api
  1. First create a console project
  2. From NuGet manager , Search for ‘Microsoft.AspNet.WebApi.SelfHost’ and install the same
  3. Create a controller and make sure it should inherit from ApiController
  4. Implement required actions based on the HTTP verbs
  5. Now we are ready for hosting.

    1. In program.cs , create an instance of HttpSelfHostConfiguration by specifying the URL to listen, then set the default route map.
    2. Create an instance of HttpSelfHostServer with the above configuration and open the connection and wait for the client requests. 
  6. Requesting for Products , just copy paste or type in the url - http://localhost:8080/Products in browser and hit enter. That's all you should be able to see the response.
When you are requesting for Products with the url - http://localhost:8080/Products , the GetAllProducts method of ApiController will serve the request. Similarly if you wish to get product by Id, you will have to pass the Id while making a request to Web Api controller. Here is an example http://localhost:8080/Products/1 , upon requesting the GetProductsById method will be invoked and it will return a single product based on the product Id.
    public class ProductsController : ApiController
    {
        Product[] products = new Product[]  
        {  
            new Product { Id = 1, Name = "Tomato Soup", Category = "Groceries", Price = 1 },  
            new Product { Id = 2, Name = "Yo-yo", Category = "Toys", Price = 3.75M },  
            new Product { Id = 3, Name = "Hammer", Category = "Hardware", Price = 16.99M }  
        };
 
        public IEnumerable<product> GetAllProducts()
        {
            return products;
        }
 
        public Product GetProductById(int id)
        {
            var product = products.FirstOrDefault((p) => p.Id == id);
            if (product == null)
            {
                throw new HttpResponseException(HttpStatusCode.NotFound);
            }
            return product;
        }
 
        public IEnumerable<product> GetProductsByCategory(string category)
        {
            return products.Where(p => string.Equals(p.Category, category,
                    StringComparison.OrdinalIgnoreCase));
        }
    }
 
    static void Main(string[] args)
    {
        var config = new HttpSelfHostConfiguration("http://localhost:8080");
 
        config.Routes.MapHttpRoute(
                "API Default", "api/{controller}/{id}",
                new { id = RouteParameter.Optional });
 
        using (HttpSelfHostServer server = new HttpSelfHostServer(config))
        {
            server.OpenAsync().Wait();
            Console.WriteLine("Press Enter to quit.");
            Console.ReadLine();
        }
    } 
Now we will see another sample implementation of WebAPI handles GET, PUT, POST, DELETE requests. For demostration purpose , I have created a WebAPI based Contact Manager application.

Use case: 
1. Ability to manage contacts , The user should be able to add/update/delete contacts.
2. Display all contacts in Home page.
Below is the Contacts Controller implementation. We are encapsulating all the CRUD operations in a repository named ContactRepository.
    public class ContactsController : ApiController
    {
        private static readonly IContactRepository _contacts = new ContactRepository();
 
        // Get All Contacts
        public IEnumerable<contact> Get()
        {
            return _contacts.GetAllContacts();
        }
 
        // Get Contact by Id
        public Contact Get(int id)
        {
            try
            {
                Contact contact = _contacts.GetContact(id);
                return contact;
            }
            catch (Exception ex)
            {
                 throw new HttpResponseException(Request.CreateResponse(HttpStatusCode.NotFound, ex.Message));                
            }
        }
        
        // Insert Contact
        public HttpResponseMessage Post(Contact value)
        {
            try
            {
                if (ModelState.IsValid)
                {
                    Contact contact = _contacts.AddContact(value);
                    var response = Request.CreateResponse<contact>(HttpStatusCode.Created, contact);
                    return response;
                }
                else
                {
                    return Request.CreateResponse(HttpStatusCode.InternalServerError, "Model state is invalid");
                }
            }
            catch (Exception ex)
            {
                return Request.CreateResponse(HttpStatusCode.InternalServerError, ex.Message);
            }
        }
        
        // Update Contact by Id
        public HttpResponseMessage Put(int id, Contact value)
        {
            try
            {
                _contacts.UpdateContact(id, value);              
            }
            catch (Exception ex)
            {
                return Request.CreateResponse(HttpStatusCode.InternalServerError, ex.Message);
            }
            return Request.CreateResponse(HttpStatusCode.OK);
        }
 
        // Delete Contact by Id
        public HttpResponseMessage Delete(int id)
        {
            try
            {
                _contacts.RemoveContact(id);
            }
            catch (Exception ex)
            {
                return Request.CreateResponse(HttpStatusCode.InternalServerError, ex.Message);
            }
            return Request.CreateResponse(HttpStatusCode.OK);
        }
    }             
Below is the code for Contact Repository.
It is built on Entity Framework Code First Approch. The Repository is composed of ContactsDbContext , with it's help we are performing CRUD operations.
    public class ContactRepository : IContactRepository
    {
        private ContactsDbContext context;
 
        public ContactRepository()
        {
            context = new ContactsDbContext();
        }
 
        public IEnumerable<contact> GetAllContacts()
        {
            try
            {
                return context.Contacts.ToList();
            }
            catch
            {
                throw;
            }  
        }
 
        public Contact GetContact(int id)
        {
            try
            {
                return context.Contacts.SingleOrDefault(c => c.Id == id);               
            }
            catch
            {
                throw;
            }  
        }
 
        public Contact AddContact(Contact item)
        {
            try
            {
                context.Contacts.Add(item);
                context.SaveChanges();
                return item;
            }
            catch
            {
                throw;
            }           
        }
 
        public bool RemoveContact(int id)
        {
            try
            {
                var contact = context.Contacts.SingleOrDefault(c => c.Id == id);
                if (contact == null)
                    throw new Exception(string.Format("Contact with id: '{0}' not found", id.ToString()));
             
                context.Contacts.Remove(contact);
                context.SaveChanges();
                return true;
            }
            catch
            {
                throw;
            } 
        }
 
        public bool UpdateContact(int id, Contact item)
        {
           try
            {
                var contact = context.Contacts.SingleOrDefault(c => c.Id == id);
             
                if( contact == null)
                    throw new Exception(string.Format("Contact with id: '{0}' not found", id.ToString()));
 
                contact.Name = item.Name;
                contact.Email = item.Email;
                contact.Phone = item.Phone;
 
                context.Entry(contact).State = EntityState.Modified;              
                context.SaveChanges();
                return true;
            }
            catch
            {
                throw;
            } 
        }
    }
 
    public class ContactsDbContext : DbContext
    {
        public ContactsDbContext()
            : base("name=ContactsDbContext")
        {
        }
 
        public DbSet<contact> Contacts { get; set; }
    } 
Setting Up the Database for Managing Contacts
Open solution - WebApi-ManageContacts in Visual Studio and Following the below steps
1. (Optional Step) Open web.config and make changes to connection string "ContactsDbContext" if required.

2. Go to Tools -> Library Package Manager -> Package Manager Console
Run Update-Database command as show below, You should be able to see the command runs successfully without throwing any errors.

PM> Update-Database
Specify the '-Verbose' flag to view the SQL statements being applied to the target database.
No pending code-based migrations.
Applying automatic migration: 201302171855006_AutomaticMigration.
Running Seed method.

Rendering contacts (MVC + Web Api Controller)
Here is a code snippet for HTTP GET verb. We are making an ajax request to get all the contacts. The request will hit the Home controller and it will execute "ContactsGrid" action. Within the action , we are creating an instance of WebAPI controller , get all the contacts and then return a partial view - ContactsGrid.
function GetContacts() {
        $.ajax({
            url: '/Home/ContactsGrid',
            type: "GET",
            success: function (response) {
                $("#contactsGrid").html(response);
            },
            error: function (data) {
                $("#contactsGrid").html(data.responseText);
            }
        });
    }
Add contacts with Web Api
Below is the code snippet for adding a new contact. Here we are making a jquery request with the url to WebApi controller, passing the contact information by serializing the data as Json object in the HTTP Request body. The content negociation with in the WebApi will understand and decode the contact information.

Note - Set the proper content type while making a request. Below you can see the content type set to 'application/json'
function AddContact() {
        var contact = {
            Name: $('#Name').val(),
            Email: $('#Email').val(),
            Phone: $('#Phone').val()
        };
 
        $.ajax({
            url: '/Api/Contacts',
            type: 'POST',
            data: JSON.stringify(contact),
            contentType: "application/json;charset=utf-8",
            success: function (data) {
                alert('Contacts added successfully');
                GetContacts();
            },
            error: function (data) {
                alert('Problem in adding contacts:' + data.responseText);
            }
        });
    }            
Deleting contacts with Web Api
Below is the code snippet for deleting contacts. We make a jquery request with the url to the Web Api controller. You will also notice that by setting the request type to 'DELETE' , helps to execute Delete method in the Contacts Web Api Controller.
function DeleteContact(id) {       
        $.ajax({
            url: '/Api/Contacts/'+ id,
            type: 'DELETE',
            success: function (data) {
                GetContacts();
            },
            error: function (data) {
                alert('Problem in deleting contacts:' + data.responseText);
            }
        });
    }            
Update contacts with Web Api
Below is the code snippet for updating the contacts. We are using Jquery model dialog, We will get the contact to update and then show up a dialog so that we can edit the contact. When we click on update button , we will make an Ajax request with the url to WebApi controller.

You can also notice the request type is 'PUT' and we are also serializing the contacts before making the request. If the update operation succeeds, we will call GetContacts() method so that it will update the contacts grid. 
function EditContact(id) {
        $.ajax({
            url: '/Home/GetContactsById/' + id,
            type: "GET",
            success: function (response) {
                $("#editContact").html(response);               
            },
            error: function (data) {
                $("#editContact").html(data.responseText);
            }
        });
 
        $(dialog).dialog('open')
    }
 
  dialog = $("#editContact").dialog({
            autoOpen: false,
            resizable: false,
            closeOnEscape: true,
            show: "explode",
            hide: "explode",
            width: 300,
            title: "Edit Contact",
            buttons: {
                Update: function () {
                    var contact = {
                        Name: $('#Name').val(),
                        Email: $('#Email').val(),
                        Phone: $('#Phone').val()
                    };
 
                    $.ajax({
                        url: '/Api/Contacts/' + $('#Id').val(),
                        type: 'PUT',
                        data: JSON.stringify(contact),
                        contentType: "application/json;charset=utf-8",
                        success: function (data) {
                            GetContacts();
                        },
                        error: function (data) {
                            alert('Problem in updating contacts:' + data.responseText);
                        }
                    });
 
                    $(dialog).dialog("close");
                },
                Cancel: function () {
                    $(dialog).dialog("close");
                }
            }
        });
Web.config changes
In order to execute HTTP requests for DELETE, PUT etc we need to add the below mentioned line under <system.webserver> so that the application handles all type of requests.

<modules runallmanagedmodulesforallrequests="true">  
Read More

© 2011-2016 Techimpulsion All Rights Reserved.


The content is copyrighted to Tech Impulsion and may not be reproduced on other websites.