Rss Feed Like Us on facebook Google Plus
Showing posts with label Window 7. Show all posts

May 26, 2014

Can’t Create File In The C Drive Root Directory – Windows

PROBLEM : while developing a java application or any windows application,writes a program to create a file in c drive but getting an error "Access Denied"Try to create an empty file in the C drive root directory manually, but no options to create any files, only new folder is allowed, although The logged in user is under administrator group.

SOLUTION


In Windows 7 or 8 (may be Vista), users (even administrators) are not allowed to create files in the C drive root directory, otherwise, an error message like “A required privilege is not held by the client” or  “access is denied” will be prompted.
To fix it, just turn off the User Account Control (UAC). In Windows 8, do not turn off the UAC via control panel, it must go through the registry.
  1. Press keys “Windows Key + R”, type regedit
  2. Locate HKEY_LOCAL_MACHINE\SOFTWARE\Microsoft\Windows\CurrentVersion\Policies\System\EnableLUA
  3. Update the EnableLUA value to 0 (turn if off)
  4. Restart Windows.


Alternatively
1. Go to control panel >> user accounts >> user account control settings >> set to never notify


2. If you think it’s not safe to turn off the UAC feature, then create a new folder under the C drive root directory and put the file inside.
C:\folder\your-file.txt - OK
C:\your-file.txt - NOT OK


Read More

September 20, 2013

Error: no such partition - "Grub rescue" , while booting the system

error: no such partition

grub rescue>

CAUSE:
1. If you delete the Linux partition on your hard drive and windows partition is still there.  When you boot the system you will get the following message:
error: no such partition
grub rescue>

2. when you  try to make partition of C Drive

Solution

Insert windows 7 disk and
1 Now from the menu list select the ‘Command Prompt’ option.
2) At the DOS prompt type the following three commands:
bootrec.exe  /fixmbr
bootrec.exe  /fixboot (may return an 'Eliment not found' message)
bootrec.exe  /RebuildBcd
3.) Close the command prompt window and click the ‘Startup Repair’ option.
4. ) The repair process may take some time, so wait until the process completes at which point you will see two messages “Windows cannot repair this computer automatically” and “Startup Repair cannot repair this computer automatically”.

These messages are the result of the radical changes made by removing the other drive. Ignore the Send/Don’t send options.

6.) Close this message window by clicking on the X in the upper right corner of the Send/Don’t send window. Next click on the ‘View advanced options for system recovery and support’ option and from the main menu once again click ‘Startup Repair’. 

This time the repair process may only that a few seconds and when prompted “Startup Repair could not detect a problem”, click ‘Finish’  and run the ‘Startup Repair’ option one more time, click ‘Finish’, and then remove the System Repair DVD and click ‘Restart’.  Reboot the computer.

Read More

August 29, 2013

Error 0x80070522: A required privilege is not held by the client.

This Problem occurs when you copy files to c drive or any other drive. the error message comes and you are not able to copy files.

or any window software not able to generate files in C drive...
This issue might occur permissions are not set properly for the C Drive.
Make sure that you are logged in as Administrator.

To take ownership of C Drive, follow these steps:
  • Right-click the C Drive and then click Properties.
  •  Click the Security tab.
  • Click Advanced, and then click the Owner tab.
  • In the Name list, click your user name, or click Administrator if you are logged in as Administrator, or click the Administrators group.
  • Click on Edit and then put a check mark against "Replace all existing inheritable permissions on all descendants with inheritable permissions from this object".
  • Click OK, and then click Yes when you receive the following message:
  • This will replace explicitly defined permissions on all descendants of this object with inheritable permissions from C-Drive (C:).
  • Do you wish to continue?
  • Once the permissions are replaced, click on OK.
  • Check if you are able to copy, paste or delete any documents now.

OR you can try the steps below

If the above steps fail then you may also want to disable UAC and check if that helps.
  • Click Start, type msconfig in the start search box, and then press Enter.
  • If you are prompted for an administrator password or for a confirmation, type the password, or click Continue.
  • Click the Tools tab.
  • Click Disable UAC and then click Launch.
  • A command window appears, and shortly thereafter, a notification bubble appears informing you that UAC is disabled.
  • Click OK and restart your computer to apply the change.
OR you can try this (it will definitely solve your problem)
  • Reboot into Safe Mode.
  • Log on as Administrator.
  • Click Start
  • Type the three letters cmd
  • Press Ctrl+Shift+Enter
  • Run the process as Administrator.
  • Type the following commands and press Enter after each:

    takeown /f c:\ /a /r /d y
    cacls c:\  /t /c /g administrators:F  System:F  everyone:F
    (Answer "yes" when prompted "Are you sure?")


The commands will make you the owner of drive C: and will give full access to everyone to all of its folders.

Read More

June 14, 2013

GOD MODE Control Panel for Windows 7

Windows 7 has a vast amount of settings that can be configured to adjust how Windows
operates. However, adjusting these settings is not the easiest thing to do. The majority of them must be adjusted using the Control Panel, found at the path Start > Control Panel.
Although the Control Panel is a good tool, it can sometimes be difficult to use. For the most part, when using Control Panel, you must toggle back in forth between numerous different windows to setup everything. This can be a pain when trying to find a specific setting that you want to configure.
However, there is one other way that you can adjust settings on your Windows 7 computer, which gives you all adjustment options in one place… Windows 7 “God Mode”.
To get to your Windows 7 “God Mode” settings, you need to first create a new folder on your desktop. To do so, right click on your desktop to bring up the secondary menu. From the secondary menu, choose New > Folder. This will add a default folder to your desktop which will be named something like New folder, or New folder 2, etc…
Next, you need to change the name of the New folder that you just created. Right click on the folder and select Properties from the drop down menu. Under the first tab, General, you will see a text box with the name of the folder. Type the following code into the text box to change the name of the folder:
GodMode.{ED7BA470-8E54-465E-825C-99712043E01C}
After you are done, click the OK button to close the folder Properties window. Now, the folder should have changed from the default blank folder icon to a Control Panel looking icon.
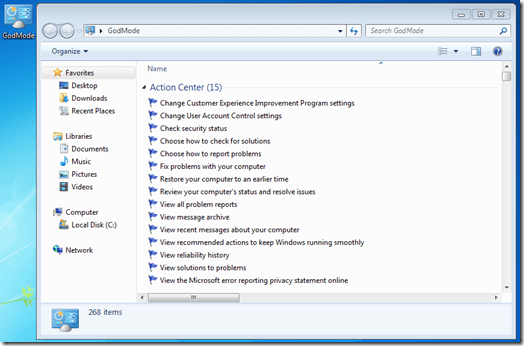
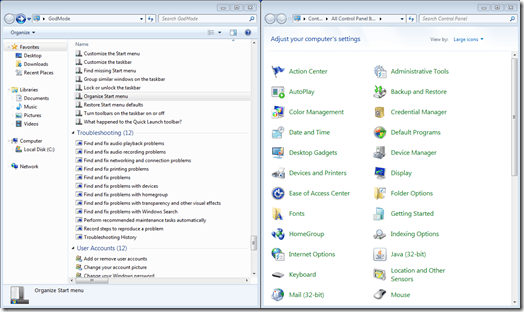
Double click on the “God Mode” icon to open it up. You will notice that it looks similar to the Control Panel window, with all options placed in list format. This is a great way to see all the available adjustments for Windows 7 in one spot.
Now, you can jump to a certain setting and configure it easily, without having to go through a bunch of different Windows. When you click on a listing within the “God Mode” window, you will be able to go straight to the adjustments.
God Mode Window
Note the differences between the Control Panel and “God Mode” panel.
control panel God mode
If you prefer not to use God Mode, but would like to have a folder/direct link to the Control Panel on your desktop, that can easily be done as well. Click the start menu button, roll your cursor over the Control Panel link, right click, and select Show on Desktop from the secondary menu.
That’s all there is to it, that is how you use Windows 7 “God Mode”, an easy way to adjust all settings for your computer in one convenient place.
Read More

March 2, 2012

Difference between Windows 7 and Windows 8

Microsoft Windows has already demonstrated Windows 8 preview of its new features in Microsoft conference Build. Though, it is the fact that the shown demonstrations are not yet completed. There are some key differences between Windows 7 and Windows 8 which are given here below-

If we talk about Windows 7 operating system, then no doubt it is good operating system to experience. It is among second best OS liked by the world after the Windows XP. Windows 7 includes many fabulous features which are creating history but no doubt, it also has some troublesome which is making people think of switching to Windows 8 operating system. Windows 8 on the other hand, has been tried to be the operating system for tablets to televisions. Microsoft Windows has already ruled the desktops and laptops and its next target is tablets, ultra books and televisions. 

The differences which Microsoft Windows brings to Windows 8 in comparison to Windows 7 are as follows-

Windows Touch friendly features

The main difference between Windows 7 and Windows 8 comes with its metro style interface that provides live title of rectangle shape which has replaced the icon pattern in Windows 8. In Windows 7 operating system, software shortcuts are in the form of icons. As far as the touch interface is concerned then Windows 7 supports touch interface but not that much, what was expected. So, Windows 8 comes with true touch interface for Metro style apps. It is fast way of accessing data by using an improved on-screen keyboard and handwriting recognition.

Windows ARM processor support

Windows 7 is fully compatible and supportive for x86 processors which is build for traditional home computers but the hint of Windows 8 operating system has changed this current scenario such that Windows 8 offers support for devices running on ARM processor. ARM processor designs are used for growing number of devices. Microsoft Windows is excited to implement ARM processor in its upcoming devices.

Windows based cloud computing

Earlier, it was not possible to store large amount of data on servers but cloud computing have made it possible. Windows 7 is not representing cloud based services but Windows 8 does. We know that Microsoft Windows will come with central cloud integration in Windows 8 operating system. It is representing synchronized data for a Skydrive which interface settings between PC's browsing and other photos which is being shared among multiple platforms.

Windows based apps store

Windows 8 operating system introduces new app store in which different apps is implemented for various devices and settings on right of the screen. The settings section includes contextual apps like volume, brightness, restart and power options. You can share content, links, app reviews, contacts, metro apps, facebook and twitter applications with your friends or colleagues. Windows 8 store offers both desktop apps and ecosystem for developers. On the other hand, Windows 7 OS is missing all these features.

Windows Start button replaced

On one side, Windows 8 is inheriting Windows 7 features like using same tile interface as used in Windows Phone 7 but on the other hand Windows 8 hints to Windows start button replacement. It is creating flexibility such that only best possible outputs are selected from Windows 7 and others are considered on basis of future predication.

Multiple monitors support in Windows

Microsoft announced that customers can use more than one monitor to connect with Windows 8 operating system. Windows 8 PC management allows customers to use multiple monitors at same time. It means Windows 8 offers flexibility by allowing start screen at one monitor and desktop in another. Customer can also choose taskbar on both screens with different icons on each monitor. Moreover, you can play with background images as well by changing it separate on each monitor. Such support is not available with Windows 7 operating system.
Read More

February 18, 2012

Some Tricks about your Operating System

Few tips for Windows 7 and OSX Lion that can save time and make you more productive

WINDOWS 7 ...

CREATE A WIRELESS HOTSPOT

With some free software, you can convert your Windows 7 laptop (or desktop with a Wi-Fi card) into a wireless router to share internet with others. Just get Connectify (www. connectify.me) or Virtual Router (http:// virtualrouter. codeplex.com) to enable this feature. Connectify and Virtual Router will not work on older editions of Windows.

VIRTUAL WINDOWS XP
There are several reasons why you would want to run Windows XP virtually within Windows 7. Maybe you have programs that only work in XP or maybe you're nostalgic. Whatever your reasons, you can download the necessary files from http://goo.gl/DCOSq.

WINDOWS MEDIA CENTER
Windows Media Center (built into Windows 7 Home Premium, Professional, Enterprise and Ultimate editions) offers more than just multimedia. It offers a 10 foot interface so that you can connect your PC to a TV and enjoy your content on a larger screen. Plus, it displays album art nicely and can stream all sorts of free content.

PLAY NICE WITH XBOX 360
If you have a Xbox 360 connected to the same network as your Windows 7 PC, you can use Windows Media Center (WMC) to stream photos, music and videos. On the Xbox, note down the 8-digit key from the WMC section in Apps. In WMC, click Tasks > Add Extender and enter the 8-digit key. Now you can access content on the Xbox.

LAUNCH APPS QUICKLY
Users of older editions of Windows probably don't know that with Windows 7, you can launch programs by just typing their name. Just click the Start button, start typing the name of the program you want to launch and the results will appear real time as you type. Just highlight the correct one and hit the enter button.

PLAY GOD FOR YOUR PC
There are various settings available for Windows 7, sometimes in various places (like control panel, personalisation, network settings menu and so on. With God Mode, you can have all settings in one place. Create a folder & name it GodMode. {ED7BA470-8E54-465E-825C-99712043E01C}. More info at http://goo.gl/qdMFT.

THE PROBLEM STEPS RECORDER
Sometimes when something goes wrong with your PC, you could spend all day trying to figure out the problem. Instead, use the Problem Steps Recorder to record what's going wrong and send it to someone more knowledgeable for a quick diagnosis. Click the start button and type PSR to bring up the Problem Steps Recorder (psr.exe) — click on 'Start Record' and run through the problem again.

MAC OS X LION ...

GET THE DICTIONARY MEANING

If you want to get the dictionary meaning for a particular word, simply take the cursor over the word and double tap the trackpad using three fingers. The text will get highlighted in yellow and a pop up box will show you the dictionary definition and synonyms from the built in thesaurus.

SEARCH SPECIFIC FILE TYPES ONLY
While searching using the search box in Finder, type 'kind:' followed by the first alphabet of the file type you are searching for (example, type P for PDF or D for DOC). A drop down menu will show you a list of various file types to choose from. Select the file type you are looking for and then type in the name of the file to search.

REMOTELY WIPE DATA
If you have setup an iCloud account on OSX Lion, just by logging in to your account from another system, you can send a remote wipe command. This is useful to remotely wipe all the data from the hard drive in case of theft. Note that FileVault encryption service should be activated for this to work.

PREVIEW YOUR SEARCH RESULTS
When you search for anything in OS X Lion using the desktop Spotlight search icon in the top bar, you can get a preview of the search results. Simply move the pointer over one of the search results and it will show you a quick look panel with a preview of the particular file's contents. Note that this works with documents and images only.

LAUNCHPAD WALLPAPER STYLE
By default, LaunchPad displays the installed applications over a blurred image of your desktop wallpaper. If you don't like that look, then simply press 'Control + Option + Command + B' to switch between various background effect styles.

ADD DIGITAL SIGNATURES TO A PDF
Open a pdf file in the Preview application instead of Adobe Reader and press Shift + Command + A to bring up the annotations toolbar. Click on Signatures and select 'Create signature from iSight'. Now, sign on a blank piece of paper and hold it up in front of the webcam — it will save your signature digitally. Whenever you want to include your signature in a PDF, just select it from the toolbar and insert it on the page.

SECURE EMPTY TRASH
Hold the Command button on the keyboard and then alternate (right) click on the Trash icon on the icon dock. The pop up menu will display 'Secure Empty Trash' instead of just 'Empty trash'. The benefit of Secure Empty Trash is that the deleted files cannot be recovered by anyone using basic data recovery tools. Note that using the Secure Empty Trash feature takes more time to empty the trash than normal.
Read More

February 7, 2012

Automatically Lock Your Computer when You are Away

Would you like your computer to automatically lock and require you to enter your password when you exit the screensaver in Windows?  Here’s how to quickly change your screensaver settings to keep your computer secure when you’re away.


To get started, right-click on your desktop, and click Personalize to open the personalization settings dialog.

Click Screen Saver under the themes to change your screensaver settings.


Alternately, if you’d rather open the screensaver settings without grabbing your mouse, hit the Win key and enter Screen Saver in the search box, and select Change screen saver.


This will open the Screen Saver settings dialog.  Select the screensaver you want, then check the box to display the login screen when you exit the screen saver.  Enter the number of minutes you want to wait before your screensaver starts, then click Ok to save your settings.


Now, after the length of time you selected, you’ll see your screensaver as normal.
Then, when you move the mouse or press a key, you’ll see the normal login screen instead of your desktop.  Enter your password and login as normal to access your computer.


Lock Your Computer Without a Screensaver

If you’re not fond of screensavers, you can lock your computer when you’re away without turning on the screensaver.  Just select None from the screensaver list, then check the box as before.  Now your computer will automatically switch to the Login screen whenever your computer is left for the amount of time you selected.

follow me on twitter
Subscribe me on Facebook
Read More

February 6, 2012

Add a Sleep Timer to Windows 7 Media Center

Do you make it a habit of falling asleep at night while watching Windows Media Center? Today we are going to take a look at the MC7 Sleep Timer for Windows 7 Media Center. This simple little plugin allows you to schedule an automatic shutdown time in Media Center. 

Note: At this point MC7 Sleep Timer doesn’t work with extenders. If you’re using ClamAV or Panda it may detect this plugin as a virus, we’ve tested it and this is a false positive for these two antivirus apps.

Installation and Usage

Download and install MC7 Sleep Timer. (See download below)

After the installation is finished, you will find MC7 Sleep Timer located in the Media Center Extras Library. Click on the tile to open the timer and configure your settings. 

The MC7 Sleep Timer will open in full screen mode. You can choose to shutdown the PC after 30 or 60 minutes, create a custom length shutdown timer at any 5 minute interval, or select the exact time you want the PC to shutdown.  After setting your PC to shutdown, you’ll get an audio confirmation.

To set a custom timer length, scroll to the “Custom timer” option and click right or left on your Media Center remote or, the right or left arrow keys, to choose how many minutes before shutdown.
To schedule a shutdown for a certain time, browse to the “Shutdown at time” button, and scroll right or left with the arrow keys on the keyboard or remote. When you’ve chosen your time, hit “Enter” on the keyboard or “OK” on the remote.


Clicking the “Monitor Off” button will turn off only the monitor and “Cancel Timer” will cancel your shutdown request.

Conclusion
If you often find yourself falling asleep every night watching Media Center and then fumbling and stumbling in the middle of the night to shutdown your computer, MC7 Sleep timer might just be a perfect addition to your Media Center setup.


follow me on twitter
Subscribe me on Facebook
Read More

January 7, 2012

Cool Shortcut Keys for Windows 7

previewpane 350x211 Coolest Windows 7 Tips and Tricks – Shortcut KeysALT + P
This opens a preview pane at the right side of explorer. Next time when you have to view some picture or movie or any other file, you don’t have to open it, just select the file and press ALT+P and see the preview.

Windows Key + Up
This combination maximized the current window. You can press it to Make window maximized. It works the same as double clicking the Title Bar

Windows Key + Down
This combination of keys, when pressed, restores the windows if it is maximized or minimizes it if not maximized. This combination should be used with Windows Key + Up to minimize, restore, and maximize any window.

Windows + Shift + Up and Windows + Shift + Down
This Key Combination makes the window Vertically maximum (Up) and back to its original place(Down). In doing so, the width of the windows remains the same. Only the height is changed.

magnifier Coolest Windows 7 Tips and Tricks – Shortcut KeysWindows Key + +(Plus) and Windows Key+-(Minus)
This combination of keys launches the built-in magnifier program and zooms in or out (depend on + or -) the screen. You can further play with this magnifier tools and use it for your own needs.

Windows Key + Left and Windows Key + Right
These are my favorite Shortcut Keys. The combination shift the opened windows to left or right of the screen. The windows then  takes exactly half of the screen. Keep pressing Windows Key + Left and your window will go to left of the screen, then right of the screen, and then back to its original place.

Windows Key + Home
There is a cool feature in Windows 7 that makes using windows easy and increase productivity by hiding all other windows and letting only one window shown. This feature is called Jitter. Using mouse you can select your windows and give it a nudge (moving mouse left and right while mouse key is pressed). This hides all other windows and keep your window opened. Repeat the same again and all other windows will appear.

Alternatively, you can use  Windows Key + Home to do the same. Press it to hide all other windows, press it again to show them.

ALT + Tab and Windows Key + Tab
windowskey tab 350x216 Coolest Windows 7 Tips and Tricks – Shortcut KeysSince long, windows is coming with these shortcut keys that come in very handy when switching between windows. The ALT+TAB key shows all the opened programs and you can switch between the windows. Press ALT (Keep Pressing) and press Tab until you find your desired program. Release the ALT key when your desired program is selected. The program windows will appear on the top.Since Windows Vista, Microsoft introduced another such feature that you can use by pressing (keep pressing) Windows Key and Pressing Tab. This feature is much cooler and lets your switch between open Programs.

Windows Key + T and Windows Key + [Number]
Window T 350x156 Coolest Windows 7 Tips and Tricks – Shortcut Keys
Windows + T is a wonder full shortcut key that lets you toggle between the programs listed in Taskbar. Press Windows Key (Keep Pressing) and Press T to move from one icon to another. The icons in Taskbar can be opened programs as well as Tabbed Programs. Windows Key + T toggle between all the icons on Taskbar and opens any program for you.

Similarly, Windows Key + [Number ] (1,2,3,…) can open the program listed at that number. If the program is tabbed, a new instance of it will be launched and if the program is running, its window will be minimized / maximized.

Windows Key + E
There is always a need to open Explorer window. But is one of its instance is running, and you click on it, the same windows appears on screen. To open a new instance of Explorer, you can either Press Shift + Click or Middle Key of your Mouse or you can simply use Windows Key + E.

Windows Key+ P and Windows Key+ shift + [Left, Right]
Window + P 350x75 Coolest Windows 7 Tips and Tricks – Shortcut KeysIf you have multiple monitors attached to you system you can easily switch between them using these Keys. Windows Key + P open the Panel from where you can select different settings for your multiple Displays. Also, you can use Window Key + Shift + Left to change between multiple screens.

Windows Key+ Space
windows7 preview desktop 350x218 Coolest Windows 7 Tips and Tricks – Shortcut KeysAnother cool feature of Windows 7 is its Peek feature. The right most button on your Task-bar is the Show Desktop / Peek button. Just hover your mouse over it and it will show your desktop by hiding all the open windows. The peek feature can also be accessed using Windows Key + Space. Press Windows Key(keep pressing) and press space to Peek at the desktop.

Windows Key + G
Gadgets are a nice addition to windows plate form since the days of Vista. There are dozen of Gadgets out there for Weather, Calender, RSS Feeds, and much more. Unfortunately, the Show Desktop button shows the Desktop with out Gadgets. Thus there is not easy way to access gadgets in time of need. But there is a trick to peek at your gadgets even if you have a dozen windows opened. Press Windows Key + G and all your gadgets will show on the top of every thing.

Windows Key + X
Mobility Center is not new to Windows. It was there in Vista too. But it is a cool feature and many of us would like to access it. Press Windows Key + X and the mobility center will appear.

Ctrl + Alt + [Left, Right, Up, Down]
Last but not the least. This is a cool feature that changes the orientation of your screen. Just give it a try and see for your self.


follow me on twitter
Subscribe me on Facebook 
 
Read More

January 5, 2012

checkout some hidden features of your Window 7 PC

Microsoft Windows 7 has some really cool Hidden Perks for its users. Today we are going to explore some of these.

psr.exe – Hidden Tutorial Maker in Windows 7...............................

During testing of Windows 7, the engineers working on the Operating System wrote a program to document movements made by mouse in order to debug the Operating System. The program is still in Windows 7 but it is hidden from public. You can access it using command psr.exe.  

Just click on Start, type psr.exe and hit enter. The following Toolbar will appear.
  Press record and go on with whatever work you want to record doing. The program will  save it in a .mhtml file that you can later use for presenting, teaching, etc. This tool also allows you to add comments. With this tool, it is very easy to make presentation and show it to people who want step by step procedure to do any work.

problem step recorder Coolest Windows 7 Tips and Tricks – Hidden Perks
By the way, there is another tool in windows called Snipping Tool that you can use to take snap shot of any thing on the screen(the above picture is taken using this tool). 

You can find it in Start >> Accessories >> Snipping Tool.

Hidden Themes in Windows 7...............................

There are a few beautiful themes and Wallpapers hidden in windows 7 that you can use. The idea by Microsoft was to Install only that theme which matches your location i.e. if you live in USA United States theme is installed automatically. The other themes that are there and not installed by default are Australia, South Africa, Canada, and United Kingdom. The themes contain  1920 x 1200 resolution wallpapers from the respective countries. Just open explorer and type

C:\Windows\Globalization\MCT 

in the address bar , hit enter. It will open the folders containing Wallpapers and themes.
Hope you like our set of hidden Perks. Do let us know in the comments. Stay tuned for more...


follow me on twitter
Subscribe me on Facebook 
 
Read More

© 2011-2016 Techimpulsion All Rights Reserved.


The content is copyrighted to Tech Impulsion and may not be reproduced on other websites.