Introduction
HTML5 is the fifth revision and the newest version of the HTML standards. Previous version (HTML 4.01) was released in 1999. In 2006, WHATWG (Web Hypertext Application Technology Working Group) & W3C (World Wide Web Consortium) came together to define the new version of HTML. Earlier, WHATWG was working with web forms and applications, and W3C was working with XHTML 2.0.
They discussed and layed out
HTML Design Principles. They were addressed towards better experience for user and easy adoption for developer which would be independant of device and plugins with a graceful fallback mechanism. HTML5 specifications were finalized on 17th December 2012 last year.
HTML5 is still a work in progress. Browsers are implementing HTML5 specifications as per their individual plans, thus we have various level of support on different browsers.
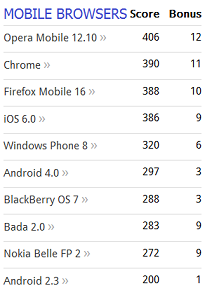
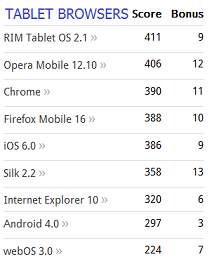
In order to know what features are supported by a particular browser, few websites shares the information in detail about HTML5 compatibility with different versions of a browser:
- HTML5 Test - provides a HTML5 score with detail on what can be used
- Can I Use - provides a table comparison of major browsers for different features
Current support scores for various browsers are:
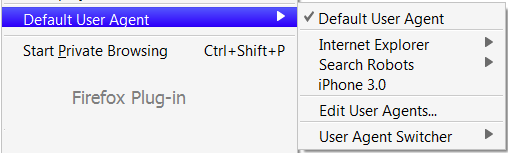
In order to develop for various browsers, we can use User Agent Switcher:
In order to have a fallback plan, while developing, we need to first check if a particular HTML5 feature is supported on the browser being used. Traditional approach of creating the dynamic element in JavaScript and checking for any of it's properties existence is good enough. Another option could be to use an open source
JavaScript library Mordernizr(MIT-licensed). It can be used in the following manner:
 Collapse | Copy Code
<script src="modernizr.min.js"></script>
<script type="text/javascript">
if (Modernizr.canvas) {
        // Congrats! Canvas is supported on your browser.
} else {
        // Sorry! No native canvas support available on your browser.
}
</script>
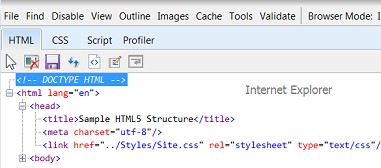
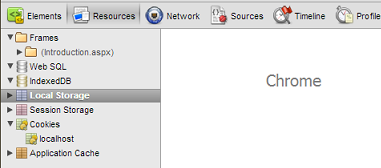
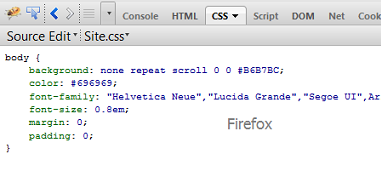
In order to have a look at internal details of the web page, explore and understand what's happening on client side in browser, Developer Tools of the browsers are extremely helpful:
Structure
HTML5 is designed such that it is not based on SGML (Standard Generalized Markup Language), thus they does not requirea reference to a DTD (Document Type Definition). So, for passing the HTML version instruction to web browser, following works:
Collapse | Copy Code
<!DOCTYPE HTML>
A new short way to declare character encoding in the webpage:
Collapse | Copy Code
<meta charset="utf-8">
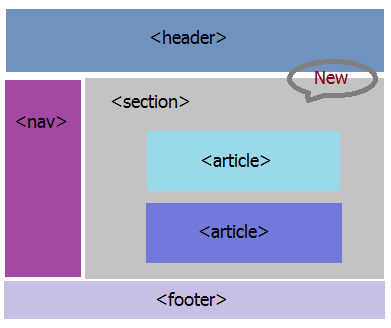
Moving forward, HTML5 has new web page elements that adds semantic to the page. Like:
- Header
- Nav
- Footer
- Section
- Article
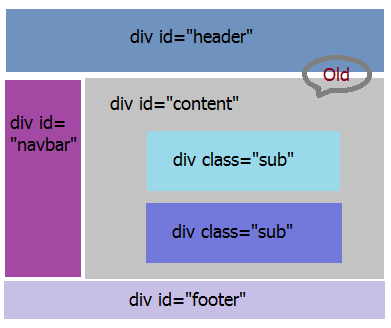
Following is the sample web page structure comparison with HTML4 design:
Here is the code snippet of an example using new structural semantics:
Collapse | Copy Code
<hgroup>
    <h1>Penning Everything Interesting…</h1>
</hgroup>
<article id="MyBlog">
    <header>
        <h2>My first blog entry!</h2>
    </header>
    <p>I was thinking what to write about. I read few articles at times that I feel like sharing across, probably ...</p>
    <br/>
    <footer>
    <section>
        <h4>One Thought on 'My first blog entry…'</h4>
        <article id="comment_1">
            <link href="#comment_1" />
            <h5>Comment by: Guruji</h5>
            <p>Very well written. Love the enthu and energy you have for sharing your knowledge...</p>
        </article>
        <article id="comment_2">
            <link href="#comment_2" />
            <h5>Comment by: SuperStar</h5>
            <p>Looks like a good start...Good going!</p>
        </article>
    </section>
    </footer>
</article>
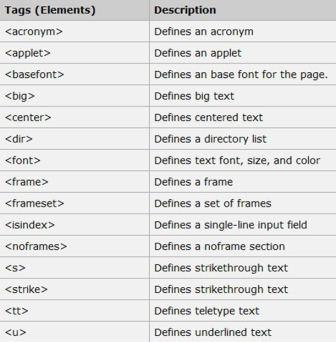
Along with addition, few elements & attributes are deprecated and are no more thereas per specification:
These above tags are not to be used by developer. Still, it has been decided that User agents will have to support them.
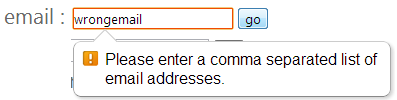
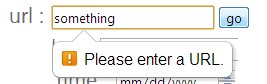
Various new form based tags and attributes has been defined in HTML5, like:
- input types and attributes
emailurlnumberdate timesearchrangecolor
- control elements
- attributes
spellcheckautofocuslistrequiredplaceholdermin and maxmultiple
- events
orientationchangeresizeonlineoffline
| | 
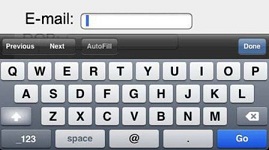 |
Few samples using them:
Collapse | Copy Code
email: <input type="email" multiple required autofocus placeholder="sample@sample.com" />
url: <input type="url" />
number: <input type="number" />
date time: <input type="date"/>
<input type="time"/>
search: <input type="search"/>
range: <input type="range" max="100" min="80" step="2" title="Your AES score" name="rscore"/>
<output name="score">90</output>
color: <input type="color"/>
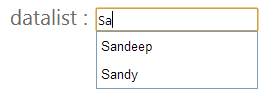
datalist: <input type="text" id="somenames" list="fullList" />
<datalist id="fullList">
<option value="Sandeep">
<option value="Deepak">
<option value="Sandy">
<option value="Deepu">
</datalist>
spellcheck:<input type="text" spellcheck="false" placeholder="Without Spellcheck">
<input type="text" spellcheck="true" placeholder="With Spellcheck">
Further, HTML5 has improved way of finding controls with new selectors. Just like jQuery selectors, HTML5 has two new selectors that help in finding the needed control quickly:
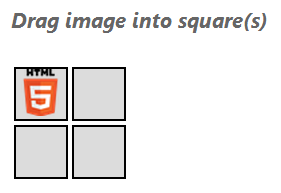
Drag & Drop
HTML5 has made drag-drop feature as part of standards and any element can be made draggale and then dragged to defined location. Attributes, methods and events related to it are:
 | |
draggableondragstartsetDatagetDataondragoverondrop
|
Sample code for above logo drag-drop will look like:
Collapse | Copy Code
function allowDropDragOver(e) {
    e.preventDefault();
}

function dragStart(e) {
    e.dataTransfer.setData("dragItemID", e.target.id);
}

function dropIt(e) {
    e.preventDefault();
    var dataId = e.dataTransfer.getData("dragItemID");
    e.target.appendChild( document.getElementById(dataId));
}

<table>
    <tr>
        <td>
            <div id="bin1" ondrop="dropIt(event)" ondragover="allowDropDragOver(event)" class="dragDropBin">
                <img id="dragImage" src="../Images/HTML5LogoSmall.png"
                     draggable="true" ondragstart="dragStart(event)" class="dragImage">
            </div>
        </td>
        <td><div id="bin2" ondrop="dropIt(event)" ondragover="allowDropDragOver(event)" class="dragDropBin"></div></td>
    </tr>
    <tr>
        <td><div id="bin3" ondrop="dropIt(event)" ondragover="allowDropDragOver(event)" class="dragDropBin"></div></td>
        <td><div id="bin4" ondrop="dropIt(event)" ondragover="allowDropDragOver(event)" class="dragDropBin"></div></td>
    </tr>
</table>
Audio & Video
This is one of the major features of HTML5 that has brought a big difference in having audio or video feature on a webpage. They will kill usage of plugins (like flash or silverlight) just based on performance. Guess what, it is super easy to implement too with just a few lines of code. Attributes, methods and events related to it are:
- Attributes & Methods
play(): To play the mediapause(): To pause the mediacanPlayType(): To check if browser can play a certain media resource typesrc: Path of the media file. One can also use the <source> elementautoplay: To play the media automaticallycontrols: To display the controls (play/pause/volume/etc) on the medialoop: To play in loopmuted: To mute the volumeplaybackRate: To vary the speed of the media
- Events
play: raised when the media is playedpause: raised when the media is pausedtimeupdate: raised when the current playback position has changedvolumechange: raised when the volume of the media has changedratechange: raised when the playback rate of the media has changedended: raised when the media has finished playingseeking: raised when the end user is seeking in the mediaseeked: raised when the seeking attribute has changed to false
| |  |
Currently, there are defined formats supported by different browsers. HTML5 based supported formats are:
- Audio: MP3, Wav, and Ogg
- Video: MP4, WebM, and Ogg
Sample code for audio & video implementation looks like:
Collapse | Copy Code
<audio id="sampleAudio" controls>
<source src="../Files/AudioSample.mp3">
<source src="../Files/AudioSample.wav">
<source src="../Files/AudioSample.ogg">
Your browser does not support the audio element.
</audio>
<video id="sampleVideo" controls src="../Files/VideoSample.mp4">
<track src="../Files/sampleSubtitles.vtt" srclang="en" kind="subtitles" label="English subtitles">
Your browser does not support the audio element.
</video>
<!---->
function CMute(controlId) {
$(controlId).attr('muted', true);
}
function CUnMute(controlId) {
$(controlId).attr('muted', false);
}
function CPause(controlId) {
if (!($(controlId).get(0).paused))
$(controlId).get(0).pause();
}
function CPlay(controlId) {
$(controlId).get(0).play();
}
function CFullScreen(controlId) {
// Only Chrome code currently.
$(controlId)[0].webkitRequestFullScreen();
}
<input type="button" value="Mute" onclick="CMute(sampleAudio);"/>
<input type="button" value="Unmute" onclick="CUnMute(sampleAudio);"/>
<input type="button" value="Pause" onclick="CPause(sampleAudio);"/>
<input type="button" value="Play" onclick="CPlay(sampleAudio);"/>
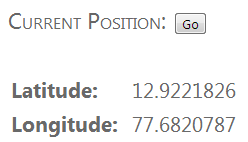
Geo Location
HTML5 Geolocation is used to locate a user's geographical position. Since this is related to specific individual usage, it can compromise user privacy. Thus, user permission is necessary in order to locate the position. In order to use Geolocation, we would need to know about navigator.geolocation object, it's methods and parameters:
- Methods
getCurrentPosition : get's location oncewatchPosition : regularly keeps pollingclearWatch : stop's watching position
- Parameters
position
- coords (Coordinates) : contains information on user location
- latitude
- longitude
- altitude
- accuracy
- altitudeAccuracy
- speed
- heading
- timestamp (DOMTimeStamp) : time when user location was obtained
PositionError : error callback object argument
- UNKNOWN_ERROR = 0
- PERMISSION_DENIED = 1
- POSITION_UNAVAILABLE = 2
- TIMEOUT = 3
- code
- message
PositionOptions : specifies options when getting user location
- enableHighAccuracy
- timeout
- maximumAge
| | 
 |
Sample code for GeoLocation - Latitude & Longitude, looks like:
Collapse | Copy Code
function getLocation() {
if (navigator.geolocation) {
navigator.geolocation.getCurrentPosition(updateLocation, handleLocationError, {
timeout: 1000000,
maximumAge: 1000,
enableHighAccuracy: false
});
}
else {
document.getElementById("supportstatus").innerHTML = "HTML5 Geolocation is not supported in your browser.";
}
}
function updateLocation(position) {
var latitude = position.coords.latitude;
var longitude = position.coords.longitude;
var timeTaken = new Date(position.timestamp);
...
}
function handleLocationError(error) {
switch(error.code)
{
...
}
}
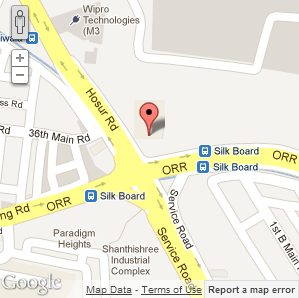
Sample code for GeoLocation - Map display, looks like:
Collapse | Copy Code
<div id="mapView" class="mapDimension1"></div>
// include the Maps API JavaScript using a script tag.
<script type="text/javascript" src="http://maps.google.com/maps/api/js?sensor=false"></script>
function showMap() {
if (navigator.geolocation) {
navigator.geolocation.getCurrentPosition(showMapLocation, handleLocationError, {
timeout: 1000000,
maximumAge: 1000,
enableHighAccuracy: true
});
}
}
function showMapLocation(position) {
var latlng = new google.maps.LatLng(position.coords.latitude, position.coords.longitude);
var myOptions = {
zoom: 16,
center: latlng,
mapTypeControl: false,
navigationControlOptions: { style: google.maps.NavigationControlStyle.SMALL },
mapTypeId: google.maps.MapTypeId.ROADMAP
};
var map = new google.maps.Map(document.getElementById("mapView"), myOptions);
var marker = new google.maps.Marker({
position: latlng,
map: map,
title: "You are here! (Accuracy: " + position.coords.accuracy + " meter radius)"
});
}
Web Storage
HTML5 provides better local storage within the browser. Currently, we use cookies for storing information on client browser but with few limitations like they are slow, unencrypted, limited to about 4KB & need to be included with every HTTP request. Web Storage is more secure and faster. It has good storage space (~5MB) on the client without affecting the website's performance. It persists and is transmitted to the server only when asked. Currently, it supports two types of storage:
localStorage: stores data with no expiration date
- Key/Value pair storage system
- Shared between window/tab for a same domain
- Data available until explicitly deleted by the user
sessionStorage: stores data for one session
- Key/Value pair storage system
- Specific to particular window/tab
Web Storage follows the storage interface that exposes API to create, read, update or delete data on the client side:
getItem(DOMString key) : Get the value of an item identified by its keysetItem(DOMString key, any data) : used to create or modify an itemremoveItem(DOMString key) : Delete an item identified by its keyclear() : Delete all itemslength : Number of items.key(unsigned long index) : Get the key of an item with a zero based index
| |  |
Sample code for implementing the web storage looks like.
Collapse | Copy Code
function SaveToSessionStorage() {
    window.sessionStorage.mySessionKeyX = 'Saved Directly in Session';
    window.sessionStorage.setItem("mySessionKeyY" ,"Saved Using Set Item");
}

function SaveToLocalStorage() {
    window.localStorage.myLocalKeyA = 'Saved Directly in Local';
    window.localStorage.setItem("myLocalKeyB", "Saved Using Set Item");
}

function GetFromSessionStorage() {
    alert("Value X: " + window.sessionStorage.getItem("mySessionKeyX"));
}

function GetFromLocalStorage() {
    alert("Value B: " + window.localStorage.getItem("myLocalKeyB"));
}

function RemoveFromSessionStorage() {
    window.sessionStorage.removeItem("mySessionKeyX");
}

function RemoveFromLocalStorage() {
    window.localStorage.removeItem("myLocalKeyB");
}

function clearAll() {
    localStorage.clear();
    sessionStorage.clear();
}
Web Workers
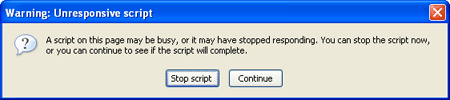
HTML5 Web Workers is a JavaScript script that runs in the background after being executed from a webpage. It runs independently from other userscripts without affecting the performance of the page.
When executing scripts in an HTML page, the page becomes unresponsive until the script is finished. Web Workers allows to perform tasks in a background process in parallel of the main browser process. Thus the page is responsive even when a worker is running. Since, web workers are in external files, they cannot access the following JavaScript objects:
window objectdocument objectparent object
| |  |
Sample code to implement workers would look like:
Collapse | Copy Code
var worker = new Worker('WebWorkerSample.js');
worker.postMessage();
worker.addEventListener('message', function(e) {
console.log('Worker said: ', e.data);
}, false);
self.addEventListener('message', function(e) {
self.postMessage(e.data);
}, false);
Web Socket
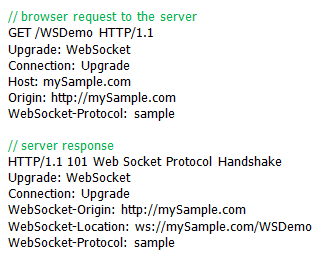
HTML5 Web Socket provides a two-way communication over one TCP connection (socket). The WebSocket API standards are defined by the W3C (World Wide Web Consortium), and the WebSocket protocol has been standardized by the IETF (Internet Engineering Task Force). For it, new protocols are introduced - ws: & wss:
It has simplified complexities around client-server communication. In order to establish a connection between client and server, for the first time when the request is sent to server, it is sent as an upgrade request from a HTTP call. Once it is upgraded, and handshake is successful, client and server can talk to each other using frames (2 bytes). Server notifies the client of new messages. General use-case of it is:
- create web socket
- define event listeners
- send message
Attributes, methods and events related to it are:
 | |
readyStatebufferedAmountonopenonmessageoncloseonerrorsend()close()
|
Sample code related to this feature looks like:
Collapse | Copy Code
function WebSocketTest() {
if ("WebSocket" in window) {
var ws = new WebSocket("ws://myServer/HTML5Demo/");
ws.onopen = function () {
ws.send("Message sent to server");
alert("Message was sent to server.");
};
ws.onmessage = function (evt) {
var receivedmsg = evt.data;
alert("Message is received from server"+ receivedmsg);
};
ws.onclose = function () {
alert("Connection is closed.");
};
ws.onerror = function (evt) {
alert("ERROR!!! " + evt.message);
};
}
}
It is efficient, has low latency (almost instant) and size. Scalable and real time applications can be easily made based on it.
Canvas
Canvas is another feature of HTML5 that is used to draw graphics on a webpage at runtime. Canvas only the container of the graphics, the whole drawing is done via JavaScript. Thus, it is mandatory to define ID, height & width of the canvas. It has methods for drawing 2-D shapes, texts, images using Paths.
General use-case of it is:
- define
canvas element
- get 2-D
context
- draw
Canvas provides methods which allow modifications to the transformation matrix:
save() & restore() - to save and restore different transformation statestranslate() - to translate the HTML5 Canvas contextrotate() - to rotate the HTML5 Canvasscale() - to scale the HTML5 Canvas
| | 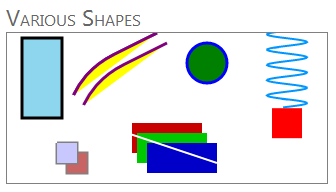 |
SVG (Scalable Vector Graphics) is another alternative. It is vector-based, relies on files whereas Canvas manipulates pixels, uses pure scripting. SVG has slower rendering due to SVG's integration into the DOM. Thus, probably not a good option for dynamic applications like games. Depending on the type of work, one need to select which to use.
Sample code related to same looks like:
Collapse | Copy Code
// Define Canvas tag
<canvas id="myCanvas" width="200" height="100"></canvas>

// Access in JavaScript to draw in it at runtime
var canvas = document.getElementById("myCanvas");
var context = canvas.getContext("2d");
context.fillStyle='Red';
context.fillRect(0,0,150,75);
context.beginPath();
context.moveTo(150, 10);
context.arcTo(80, 45, 3, 200, 90);
context.fillStyle = 'Yellow';
context.fill();
context.strokeStyle = 'Purple';
context.stroke();
context.closePath();
Offline Application
HTML5 Offline is another major feature that helps in browsing a web application even when there is no network connection. Web application has a reference to a manifest file that holds the information about the files that needs to be cached and kept, not to be cached and fallback rules for non cached files. Local copies are cached and kept without any expiration rule. If application finds any change in manifest when it goes online, local files are updated to make it up-to-date. In absence of network connection (an onLine flag present in DOM tells it), webpages and related files are served from the local cached copies.
Sample Cache Manifest file looks like:
Collapse | Copy Code
CACHE MANIFEST
# Cache manifest – version & date
# version 2.1.24
# 02.01.2013


# Cache – resources to cache with html page
CACHE:
Cache-Control: no-cache, private
Styles/Site.css
Images/HTML5.png
Scripts/jquery-1.4.1.min.js
Scripts/jquery-1.4.1-vsdoc.js
Scripts/Utilities.js
Scripts/OfflineApp.js
offline.manifest
# Images/HTML5LogoSmall.png


# Network – files that will not be cached and will always be online
# Following resources require network connection.
# * - it’s a special flag (meaning all resources that are not cached will require a connection.)
NETWORK:
*


# Fallback – display for all uncached pages/resources [precedence below Network]
# FALLBACK:
Images/ShowFullscreen.png
#site/images/ images/offline.jpg
#*.html offline.html
ApplicationCache has various states that tells the status of the cache based on the manifest file:
- 0 UNCACHED : cache is empty
- 1 IDLE : cache is latest
- 2 CHECKING : checking for a new updated version of the cache
- 3 DOWNLOADING : downloading the new cache
- 4 UPDATEREADY : ready to be used
- 5 OBSOLETE : cache is marked obsolete
Sample code for tracking Offline capability is like:
Collapse | Copy Code
var cacheStatusMessages = [];
cacheStatusMessages[0] = 'uncached';
cacheStatusMessages[1] = 'idle';
cacheStatusMessages[2] = 'checking';
cacheStatusMessages[3] = 'downloading';
cacheStatusMessages[4] = 'updateready';
cacheStatusMessages[5] = 'obsolete';
var appCache = window.applicationCache;
appCache.addEventListener('cached', logEvent, false);
appCache.addEventListener('checking', logEvent, false);
appCache.addEventListener('noupdate', logEvent, false);
appCache.addEventListener('downloading', logEvent, false);
appCache.addEventListener('progress', logEvent, false);
appCache.addEventListener('updateready', function() {
window.applicationCache.swapCache();
console.log('Update was ready. Swap Cache done.');
}, false);
appCache.addEventListener('obsolete', logEvent, false);
appCache.addEventListener('error', logEvent, false);
function logEvent(e) {
var online, status, type, message;
online = (navigator.onLine) ? 'yes' : 'no';
status = cacheStatusMessages[appCache.status];
type = e.type;
message = 'online: ' + online;
message += ', event: ' + type;
message += ', status: ' + status;
console.log(message);
if (type == 'obsolete')
alert('Manifest got deleted. Offline will not work anymore.');
if (type == 'error')
alert('Error:' + e.message);
}
Device Support
HTML5 have defined ways to support multiple devices. It's a key to mobile page optimization.
- Viewport Meta Tag - it controls browsers page display, by telling the browser how content should fit on the device's screen. Further, it informs the browser that the site is optimized for mobile devices. Sample use:
Collapse | Copy Code
<meta name="viewport" content="width=device-width, height=device-height, initial-scale=1.0, user-scalable=yes"/>
- CSS Media Queries - these are media based stylesheets, that enables the content's presentation to be customized to a specific range of output devices without having to change the content itself.
- External stylesheet :
Collapse | Copy Code
<link rel="stylesheet"  media="handheld, only screen and (max-device-width: 320px)" href="phone.css">
<link rel="stylesheet"  media="only screen and (min-width: 641px) and (max-width: 800px)" href="ipad.css">
- Within the
<style> element (or in css file) as a media rule:
Collapse | Copy Code
@media only screen and (max-width: 480px){
   /* rules defined inside here are only applied to browsers that support CSS media queries */
   /* and the browser window is 480px or smaller */
}
- Imported stylesheet within the
<style> element:
Collapse | Copy Code
@import "smallscreen.css" only screen and (max-width: 480px);


 Click the “Template” tab on the Blogger dashboard, then the “Edit HTML” button, to see the new template HTML editor:
 Locate the “Blog1” widget quickly using the new “Jump to widget” drop down:
 This widget controls how your blog posts are displayed. The code inside
the widget is folded by default. Clicking the new fold markers ‘►’ next
to the line numbers expands the widget and reveals a set of “includable”
tags:
This widget controls how your blog posts are displayed. The code inside
the widget is folded by default. Clicking the new fold markers ‘►’ next
to the line numbers expands the widget and reveals a set of “includable”
tags: Inside the “main” includable is the block of code that renders the post date:
 Cut the post date code section and move it to where we want it, in this case, under the post title in the “post” includable:
 To check our changes, click the new “Preview template” button to see the updates: